
After reading several inspiring blog posts, I decided to organize my bathroom drawer with some DIY drawer dividers. While it isn’t quite a junk drawer, it sure had accumulated a lot of junk.
Now I am going to share with you a before photo… but be a good friend and don’t let this circulate the globe, n’kay?
Or at least don’t forward it to my dermatologists house.
He would die if he saw me using half the products I put on my face.
And then come back to life and die again when he looked at the expiration dates.
Not kidding.

After a major drawer purge, I had my makeup down to the essentials and got to work. I realized that a store bought insert just wasn’t working for me because it doesn’t utilize all of my drawer space.
Custom made insert to the rescue!
DIY Drawer Dividers Tutorial:
First, I went to my local Home Depot and picked up some wood lathes. These are just thin pieces of wood used in plaster work. They usually come in 48 inch long pieces, and are super cheap.
Just .55 a piece at my local store. Sweet!

Most home improvement stores will cut wood for you at no charge, so I went with my drawer measurements and just had the pieces cut there.
And then I sat on the floor and laid it all out to make sure I had enough pieces for the DIY drawer dividers.
And then had them cut some more.
And more.
They love me at Home Depot.
Then I went to look for wood glue, and the same employee who cut the wood and watched me lay all my pieces all over the floor happened to be in the glue and tape aisle.
And I made him help me find the cheapest wood glue.
That wasn’t awkward.

When I got home I laid the pieces out and glued everything together.
Well, actually I had a Diet Coke first, ’cause chasing my three year old around Home Depot is exhausting.
I know most people would recommend using large clamps to hold drying wood glue in place.
Meh. You don’t really need them for these DIY drawer dividers. Just try to make sure everything is straight.

The reason this project is so renter friendly is that you can make a custom drawer insert, but you don’t have to permanently glue it in. It can easily be removed and taken with you wherever you go. Or, just make a new one next time you move since the wood is so cheap.
After the wood glue dried, I next gave my insert two coats of white paint.

After the paint was dry, it was ready to go in my drawer!
On a side note, you can also easily protect the bottom of your drawer by using a piece of masonite glued to the bottom of your DIY drawer dividers. I decided to just use a drawer liner since I can purchase a roll for just a few dollars, and then cut it to size.

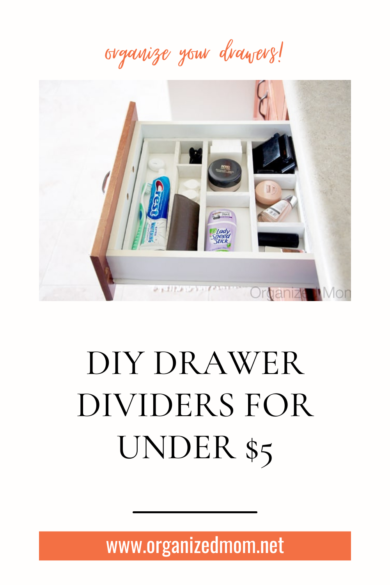
Now my custom insert is ready to go!

Oh my awesomesauce! I totally love how it turned out. Not only did this project force me to purge, but it gave everything it’s own little special place.
Hooray for no more brushing with a toothbrush that taste’s like deodorant!
(Maybe that was too much information.)
Seriously, I love how easy this was. I am totally going to do it in all my bathrooms!


Dee Jacksons
Thursday 9th of March 2017
Great DIY. You did a wonderful job. Love this drawer organization tip.
15 Clever and Inexpensive Drawer Organization Ideas | The Crafting Nook by Titicrafty
Friday 23rd of December 2016
[…] via Organized Mom […]
Darci
Sunday 13th of November 2016
Wish I had read your post before. I had the same thing done, but it was just trial and error. The Home Depot employee was really helpful. He had to walk me through step by step. However, had I read your instructions before, I would have been more prepared.Lucky for me I had the Home Depot employee who knew what he was doing, not only cut the wood but helped me with the wood glue.
Leah
Monday 26th of September 2016
I can't thank you enough for posting this!!! I did my drawers and it was beyond amazing!! Plan on doing this in all drawers possible:-)
10 DIY HOME HACKS YOU NEED TO KNOW - The Rental Girl Blog | The Rental Girl Blog
Wednesday 14th of September 2016
[…] DIY Drawer Organizer: this do-it-yourself drawer organizer allows you to customize your storage to perfectly fit your […]